This is the traditional time of year when people (particularly parents) consider the purchase of a telescope as a holiday gift. A loved one — often a child, but not always — shows an interest in astronomy, or maybe just science in general, and the gift-giver assumes that a telescope is the proper introduction to the hobby of observational astronomy. I’m going to make the argument that this may not be the best choice. Don’t get me wrong; I love telescopes. I currently own eight (I think; I lose track), and I even built a couple of them myself. But I’ve come to the conclusion that a telescope is not necessarily the best first step in getting started in astronomy; that they are a wonderful thing to have, but that they should come later. After I explain my thinking on this, I’ll make some inexpensive, alternative suggestions for budding amateurs.
Well, first, high-quality telescopes, telescopes you’d want to keep and use for a lifetime, are fairly to very expensive (starting at around $250, and going to as high as you care to imagine). Oh, there are acceptable scopes that don’t cost as much, and that are specifically designed for absolute beginners; and the variety of such scopes is growing. But, if the recipient of such a scope ends up getting excited about astronomy, despite the shortcomings that allow these scopes to be made inexpensively, then it might not be long before the telescope seems inadequate. On the other hand, the limited views through such scopes — caused by small, cheaply-made mirrors or lenses — may actually be a crushing disappointment.
Another argument I’d make against buying a telescope as a first step, even a more expensive one, is that there are too many choices for the uninitiated to pick from; and that, among these choices, there is a huge selection of absolute junk! Some scopes look to be well-made, but are not. Like buying any item with lots of available options — a car, a camera, a bicycle — choosing a decent telescope takes some background knowledge. And, it isn’t always safe to trust the knowledge of salespeople; they often know very little about what they sell, especially in stores that only sell scopes as one item among many.
Finally, nearly all telescopes take some time to set up, and practice to use. Aiming, focusing, ‘tracking’ (following the object in the sky through the eyepiece as the earth turns on its axis); all of these involve a learning curve, even with small scopes. This is fine, and even fun, for someone who is committed, but maybe not so much for someone who is not yet sure about the hobby.
Getting started in astronomy doesn’t need to cost anything at all. All you need to do is go outside at night and look up. If you live in a large city, what you see will be limited by the bright, artificial lighting all around you. But even there, you can see the moon and several planets; and, except in the center of the very largest cities, at least some of the brighter stars. A great gift to give someone (and yourself) is a trip to a place with dark skies. Though a high, isolated mountaintop would be best, it isn’t necessary, especially if you’ve spent your life in a big city. I live in a small town (population, about 2,000) in western Wisconsin, and I can see the Milky Way (our own galaxy) from my back yard. I can also clearly see thousands of stars, including all the main stars in the constellations visible from this part of the world.
Make your trip on a night when the moon is either new or a thin crescent (thin crescents either set shortly after the sun in the evening, or rise shortly before it in the morning.) The moon is very interesting, but not the best naked eye object in the night sky; and its light blocks out the light of everything else in the night sky. Here’s a link to a website where you can look up the phases of the moon. And here’s another that will help you find a dark site within much of North America.
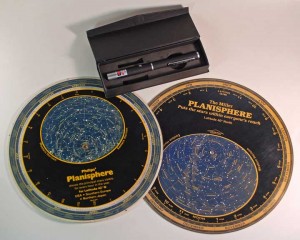 To enjoy the view of a dark night sky, even with the naked eye, it helps to know what you are looking at. A very easy way to get started is with a device called a planisphere. The photo shows two of slightly different size. A planisphere consists of one disc placed on top of another, and the two are held together in the middle with a grommet that allows them to spin freely. On the edge of one disc are the 24 hours of the day, and on the other are the dates of the year. When you match an hour to a date, you will see an oval image of what will be in the sky at that time. The oval is only several inches across, so the detail of what it shows is limited, but a planisphere is one of the best ways to learn how the night sky changes from hour to hour and month to month as the earth both spins and orbits around the sun. It is also the only thing you need to begin learning your way around the constellations. Good, waterproof, planispheres can usually be found in any decent bookstore, or ordered online, for between $10 and $20. You can also download a free PDF file here and print your own on card stock. It is best to get a planisphere that is made for use at your latitude on the earth, but it need not be exact.
Learning the constellations is more fun when it’s done with someone else, and it’s a great activity for families. But it isn’t easy for two or more people to know just which star another is looking at or pointing to. A green laser pointer is the perfect solution. 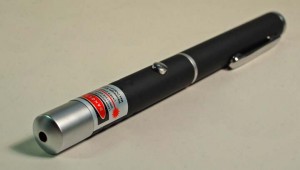 The human eye is particularly sensitive to green light, and these pointers shine a thin, visible beam high into the sky (the more common red laser pointers show no beam). Until a year or so ago, these were quite expensive, but they can now be found online for under $20. But heed this warning: these are not toys! Laser light can damage the eye, and the beam these throw can be very hazardous to airline pilots and others, even at a distance of miles. Only lasers of class IIIa, with an output power of 5mW or less, can be used as pointers. Some retailers sell much more powerful lasers, but they are not legal for use outside. The Class IIIa pointers are perfectly legal, and very useful, but should be used only with responsible supervision.
The next step, after the naked eye, might be a pair of binoculars. Kids often find them easier to use than telescopes, since you just put them up to both eyes and aim. Binoculars will show craters on the moon, and the moons of Jupiter. They can take you from seeing a few thousand stars to more than 100,000. Star clusters, galaxies, and other ‘deep-sky’ objects become visible.
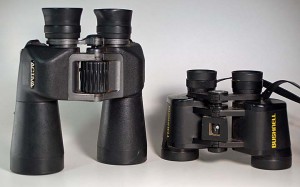 Any pair of binoculars will show you more than your eyes can see, but some are not really suited to astronomy. The photo shows two pairs that work well. On the right is an inexpensive (less than $40) pair with the designation ‘7×35’. This means that they magnify images by 7 times, and that the objective lenses (the larger lenses you point at the object to be viewed) are 35mm across. The pair on the left cost much more (about $150), but are of much higher quality, as well as being better for astronomy. They are ‘10x50s’, giving 10x magnification through 50mm objectives. The larger lenses, more than the higher power, are most important for astronomy, since they bring more light to your eyes, allowing you to see dimmer objects. And many interesting things in the night sky are invisible to our eyes, not because they are small, but because they are dim.
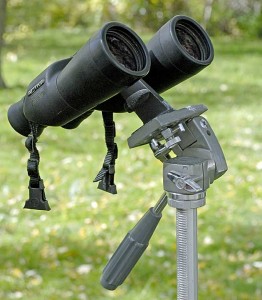 Avoid binoculars with these features: ‘ruby’ coatings, zoom magnification, fixed focus, magnification higher than 10x, and objective lenses smaller than 30mm. Also avoid inexpensive pairs with straight tubes (rather than the angled type shown in the photo). These use a different type of prism to bend the light path, and it’s difficult to make this type of prism work well in an inexpensive pair of binoculars. Finally, it’s best to get binoculars that you can actually look through before buying. The lenses have to be lined up perfectly, and I’ve gotten some through mail-order that were not even close.
If you buy binoculars, also try to make sure they have the ability to be mounted on a tripod (most decent ones have this feature. Tripod-mounting is helpful because it allows anyone to get much steadier views, and it also allows more experienced users to share the view with youngsters and others by aiming at an object and then letting others look. If you already own binoculars and a camera tripod, a tripod adapter would make a very nice astronomy gift, and is not very expensive. I just did a web search for ‘binocular tripod adapter’ and found several for under $20. 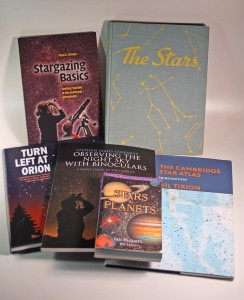
Whether you buy binoculars or not, you can spend a lot of time learning about the night sky. A planisphere is a great way to get started, but there also many great books to help people who are just starting out. The photo shows some that I have found especially useful. My own, Stargazing Basics, was written to help absolute novices with both equipment buying and the rudiments of what’s up in the sky. The rest of these are all excellent books to help people — even beginners — observe objects in the night sky.
Each of these suggestions is much less expensive than a telescope, and much easier to choose and to use. Yet each can also lead to enjoyment and exploration of the night sky. Once someone is ‘hooked’ on astronomy, then I believe that the effort involved in buying and learning to use a telescope will be much more satisfying.
Latest Comments
Have your say!